¶ Install CloudPanel
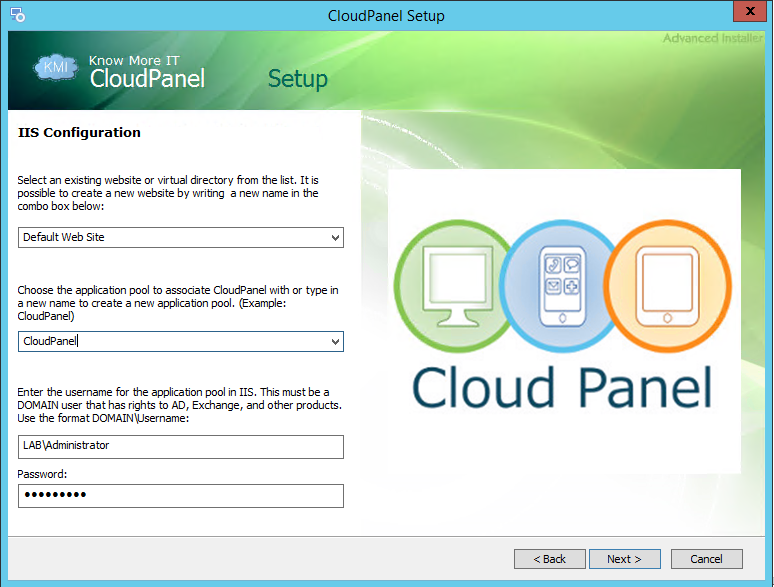
When you first run the installer you will be asked to provide information for the IIS configuration. We recommend you leave the default setting for the website to “Default Web Site” and enter a new name such as “CloudPanel” for the application pool. The credentials are used to run the application pool as the user you enter in the bottom fields which should be in the format of DOMAIN\Username.
Note: If you enter a new website in the first drop down box then it could disable your currently running website that is running on port 80. Entering a new website will cause the CloudPanel installer to create a new IIS website using port 80. During this process it still creates the virtual directory “CloudPanel” inside the new website and this must be deleted. The reason is because it sets the root website and the virtual application to the exact same paths and causes issues if you try to browse to the virtual directory.
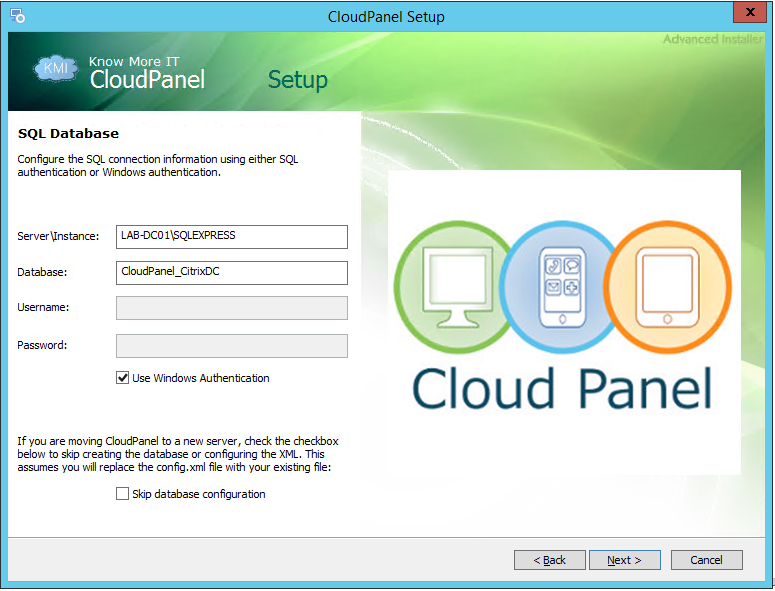
The next dialog will ask you about your SQL server information so the CloudPanel installer can create the database. You must provide the SQL server name AND the SQL instance (the sql instance isn’t required if you use the default instance MSSQLSERVER). When you click the next button it will verify if it can access the SQL server.
Note: CloudPanel allows the use of Windows authentication or SQL authentication when installing. If you are using Windows authentication, then the user account you are using to install CloudPanel must have rights to create the database on the SQL server and the user account you set on the previous install window for the application pool must have rights to the CloudPanel database.
If you are having issues with getting CloudPanel to authenticate with SQL then we suggest you use SQL Management Studio and test connecting to the same server name and instance that you specified in the CloudPanel install and using the same SQL credentials.
¶ Install Your License
CloudPanel comes with 250 users that will ALWAYS be free, but in order to expand the amount of users you can add to CloudPanel you must purchase a license. There are two types of licenses you can purchase for CloudPanel:
- Yearly: You pay for licenses in blocks of 250-users once per year. This avoids you having to deal with making monthly payments and can also render greater discounts at higher quantities (although lower quantities we don’t offer many discounts).
- Monthly: You pay per user per month (excluding your free 250 users) for every user that you have above 250. If you have 300 users, then you would only be invoiced for 50 users for that month.
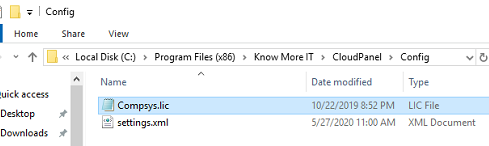
Once you have received your license file from sales, you will need to place this file in the Config directory where you installed CloudPanel. Typically this path is C:\Program Files (x86)\Know More IT\CloudPanel\Config
Note
Do not duplicate your license file. Each license file contains a unique code and if there are any duplicate *.lic files it will invalidate them if there are duplicates.
¶ Recycle The Application Pool
Once you have placed the license file in the directory, you must recycle the application pool that CloudPanel is using. Go to IIS and open the Application Pools, find the one tied to your CloudPanel application, right click and choose Recycle
¶ Install the CloudPanel Scheduler Service
CloudPanel comes with a Windows service that runs on one of your servers to execute longer running tasks. This service is required in order for CloudPanel to gather all of the data that is needed for it to run properly and also to populate your system with statistics from your environment.
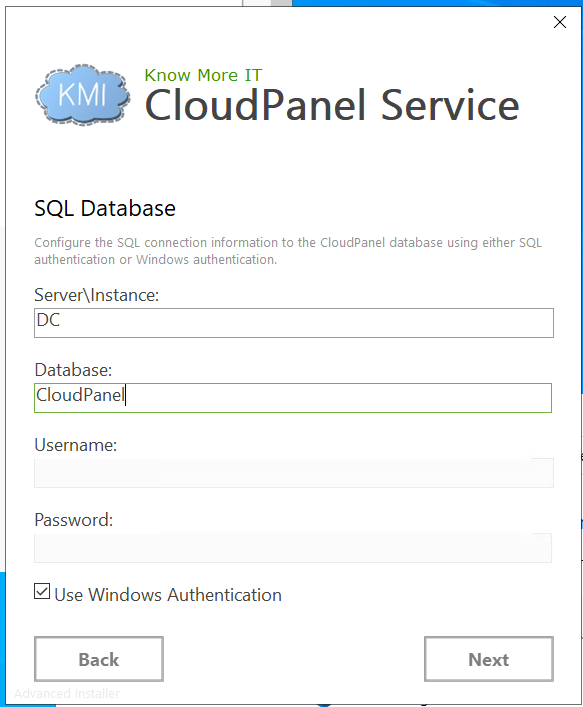
To install the service, run the installer and point it to the same database that CloudPanel is using. It is recommended to use the same account that you setup with CloudPanel. Your account must have Log On As A Service rights or the install may get stuck at starting the service. If this happens, start the service manually with the services.msc snap-in and then click retry in the installer.
¶ Configure CloudPanel Scheduler Service Advanced Settings
After the service is installed, there are a couple of settings that you may want to tweak to fit your environment better. To change these, you will need to browse to the installation directory (C:\Program Files (x86)\Know More IT\CloudPanel Service) and edit Scheduler.exe. Find the <appSettings> section:
| Setting Name | Default Value | Description |
| connectionString | <unique per environment> | This is the SQL connection string that is automatically created when you install the CloudPanel service. |
| ThreadCount | 3 | By default, the CloudPanel service will not use more than 3 cpu threads or run more than 3 tasks at a time. If you have a large environment, you will want to adjust this to best fit the amount of processor cores that are in your system. |
| ProcessIISLogs | True | Starting with 3.2.1006, CloudPanel now has the ability to process IIS logs on each of your Exchange servers to collect data about the User-Agents, IP Addresses and timestamps of customers that are hitting your /rpc, /mapi, /microsoft-server-activesync, and /ews. If you wish not to process IIS logs due to performance reasons, please set this value to False. |
Note: The CloudPanel account you are using must have access to the IIS logs location on each Exchange server, otherwise it will fail to process the IIS logs. If the account you are using is a Domain Admin or a high privileged account, it should be able to access it by default. If you are using granular permissions to lock down the account rights, you will need to share out the W3SVC1 folder on each Exchange server and provide your CloudPanel service account read rights to the share and files.
Customize: If you have the X-Forwarded-For header in your IIS logging on Exchange, you will need to change the regex that CloudPanel Service uses to read your log files. You can do this by editing the regex_iis.txt file located in C:\Program Files (x86)\Know More IT\CloudPanel Service\data. CloudPanel Service uses the group name as you see in the default regex examples, so make sure you put the group name in the correct spot (I.E. moving from reading c-ip to reading X-Forwarded-For still needs to keep the group name “sourceip”)